Mallets for Sale
Tuesday, October 4th, 2011I am selling some mallets at the 3rd Ward Shopbox. Their focus is “Made in America + Shipping to America:.

I am selling some mallets at the 3rd Ward Shopbox. Their focus is “Made in America + Shipping to America:.
I was at the Maker Faire on Saturday and stopped by the Instructables tent. For those that don’t know, Instructables is a great site that has a bunch of crowd sourced how-to’s, a lot of great stuff. I’ve posted a few myself.
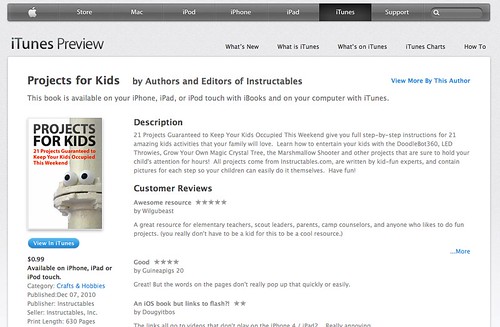
Anyway, I met Eric Wilhelm, the founder of the site. We got to talking about some of the projects I’ve posted, and it turns out one, Making Faces, was published in an ebook, Projects For Kids. In fact, it made the cover. Kind of a fun surprise.
Today is my first day of class at the NYU ITP (Interactive Telecommunications Program) program. I’m so excited and can’t wait to be making some cool stuff. Let the craziness begin.

Next up for Design Week, Use Me. The American Design Club is holding its 6th show, “an exhibition by 45 young American designers of unapologetically functional objects, each of which exhibits a strong sense of purpose, intelligent use of materials, and the ability to do one thing extremely well.” The list of designers showing is pretty impressive, I’m honored to be among them.
I will be showing the Secret Passageway Switch, and it will be for sale.
The American Design Building at Great Jones Lumber
45 Great Jones Street
New York, NY 10012
Friday May 13 – Monday May 16, 12PM to 7PM

I just got rid of my last piece of Ikea furniture, I’m officially an adult.
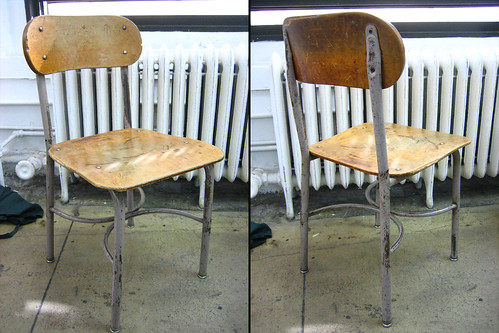
This beauty takes me back to my Sunday school days. A school on 22nd and Lex was tossing out a lot of great stuff, I saw a guy walk off with a globe. I had my choice between this chair and an overhead projector. I stand by my decision.

Recently, I started selling some work through an online store, Greenpoint Originals. It’s a new store featuring hand-picked work from artists and designers from around the Greenpoint Brooklyn area. I am very lucky and humbled to be among them.
Please, take a look.
The DIY Salon at the Museum of Arts and Design (MAD) was fantastic!
So many people showed up ready to make, it was great. And almost everybody who tried the star, stuck it out. Even though it was much more complicated than I originally thought and my directions were sketchy at best.
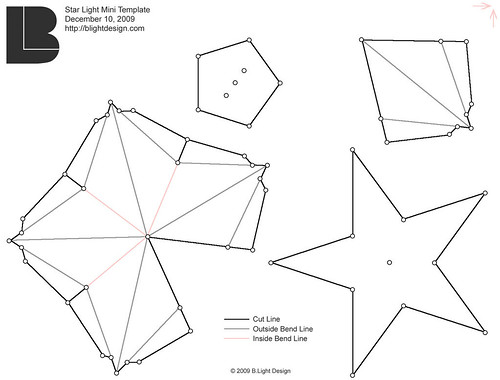
You can get the star light mini template here (pdf). And the directions to make it below:
1. Wrap the center of a piece of 22 gauge wire (around 5 - 7 inches long) around a Christmas tree light bulb
2. Place the template over a manila folder and using a nail, punch a hole in each of the dots. Make sure to press hard enough to go through both sides of the folder.
3. Using an exacto knife or scissors, cut out the star and the backing. See the template for details
4. Using a hole punch, punch a hole in the center of the star and the backing.
5. Bend the wire, using needle nose pliers, to match up to the two small holes on the backing
6. Using double sided tape, tape the backing to the star. Make sure to line up the punched holes. Check to see that a Christmas tree light bulb fits in the hole. Put this aside for now.
7. Using an exacto knife, score the outside bends on the folder. See the template for details. (If you are making two stars at the same time, now is a good time to score the outside bends on the second half of the folder.)
8. Open up the folder and score the inside bends. See the template for details. (If you are making two stars at the same time, now is a good time to score the inside bends on the second half of the folder.)
9. Using and exact knife or scissors, cut out the remaining pieces. See the template for details. (If you are making two stars at the same time, use and exacto knife and punch hard to make sure you cut through both sides of the folder.)
10. Break the bends.
11. Using clear tape, tape the two folded pieces together.
12. Using double sided tape, tape the inside of one flap on each of the star points.
13. Attach the taped flaps to the star/backing/wire assembly.
14. Using a hot glue gun, run a small bead of glue on the taped flap (one at a time), and secure the other flap down. Do this for each star point.
Want to thank Jessica, Dess, and Molly for making this happen.