Archive for the ‘Finished Project’ Category

A Very Made-y Christmas

Tuesday, January 5th, 2010

It’s that time of year again, like last Christmas (and many many many others), my family made gifts for each other.

I made my sisters Lake Log lamps and bowls, made my mom a big mallet for cooking, made my nephew some wooden toys, and a couple of small chalkboards for the little guy as well.

My sisters made necklaces, plates and coasters out of resin, pillows, and toys. Take a look.

Get the flash player here: http://www.adobe.com/flashplayer

How to Make Star Light Minis

Monday, December 14th, 2009

Star Light Mini Template

The DIY Salon at the Museum of Arts and Design (MAD) was fantastic!

So many people showed up ready to make, it was great. And almost everybody who tried the star, stuck it out. Even though it was much more complicated than I originally thought and my directions were sketchy at best.

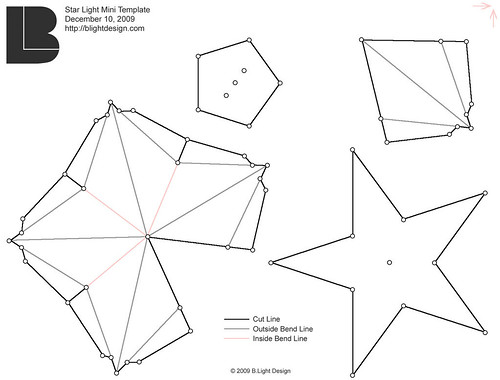
You can get the star light mini template here (pdf). And the directions to make it below:

This project uses sharp tools and hot glue. Please be careful.

1. Wrap the center of a piece of 22 gauge wire (around 5 - 7 inches long) around a Christmas tree light bulb

2. Place the template over a manila folder and using a nail, punch a hole in each of the dots. Make sure to press hard enough to go through both sides of the folder.

3. Using an exacto knife or scissors, cut out the star and the backing. See the template for details

4. Using a hole punch, punch a hole in the center of the star and the backing.

5. Bend the wire, using needle nose pliers, to match up to the two small holes on the backing

6. Using double sided tape, tape the backing to the star. Make sure to line up the punched holes. Check to see that a Christmas tree light bulb fits in the hole. Put this aside for now.

7. Using an exacto knife, score the outside bends on the folder. See the template for details. (If you are making two stars at the same time, now is a good time to score the outside bends on the second half of the folder.)

8. Open up the folder and score the inside bends. See the template for details. (If you are making two stars at the same time, now is a good time to score the inside bends on the second half of the folder.)

9. Using and exact knife or scissors, cut out the remaining pieces. See the template for details. (If you are making two stars at the same time, use and exacto knife and punch hard to make sure you cut through both sides of the folder.)

10. Break the bends.

11. Using clear tape, tape the two folded pieces together.

12. Using double sided tape, tape the inside of one flap on each of the star points.

13. Attach the taped flaps to the star/backing/wire assembly.

14. Using a hot glue gun, run a small bead of glue on the taped flap (one at a time), and secure the other flap down. Do this for each star point.

Want to thank Jessica, Dess, and Molly for making this happen.

Cardboard Tube Nunchucks

Sunday, November 22nd, 2009

Cardboard Tube Nunchucks

I have always wanted nunchucks (or nunchaku), but I would probably hurt myself seriously if I had the real deal. So I made some using paper towel tubes and some rubber coated caps. Not exactly a perfect example of green design, but it might come in handy for this.

Some pics below of the build process.

Get the flash player here: http://www.adobe.com/flashplayer

Toying With Art

Thursday, November 12th, 2009

Toying With Art Invitation - Front

I have some very exciting news, I have two pieces in a show that is in a real live museum. Finn’s Army and Making Faces both got into the Toying with Art show at the Cameron Art Museum. The museum is in Wilmington, NC, and runs from November 13th to March 28.

There are some incredible artists involved and I am very flattered and humbled to be included.

Happy Halloween

Monday, November 2nd, 2009

This year for Halloween I went as a Showcase contestant on the Price Is Right. I built a cardboard podium that lit up with “OVER” and “1″ (always wanted to bid one dollar on the PIR).

I didn't want that Hot Tub anyway

Wiring up the lights was a pain, but I’m pretty happy with how it turned out. And again, I wasn’t the first to come up the idea. Some shots below of the build process.

Get the flash player here: http://www.adobe.com/flashplayer

Tagged Mobile Homes

Friday, September 25th, 2009

I am very excited about this project.

Get the flash player here: http://www.adobe.com/flashplayer

It started with a great idea from Kiel Mead. During the Hue Are You? show he said, “Wouldn’t it have been cool if we got street artists to tag all of the Mobile Homes houses?” Yes it would Kiel, yes it would.

Once I met superk8, things started to happen. Kate was my connection to some great people. She and a bunch of other artists get together for a show called the Conscious Cycle (the video below is actually last year’s Conscious Cycle).

Conscious Cycle Figment from knox on Vimeo.

The Conscious Cycle was held on Governors Island in NYC during the Figment festival. I met a bunch of great people there, and everyone was cool with lending me a hand. During their down time from painting the mural, they all decorated my silly little houses. So cool. I think they all turned out great.

The artists involved are:

superk8
Royce Bannon
Chris from Robots Will Kill
Veng from Robots Will Kill
Lou Auguste
Vince
cake
Infinity - Endless Love Crew

Thanks again everybody.

Designs in the Wild

Friday, September 11th, 2009

Some quick shots of where my designs finally ended up. Thanks everybody for digging what I’m doing.

Get the flash player here: http://www.adobe.com/flashplayer

Lake Log Lamp

Monday, August 10th, 2009

I’ve talked about the logs I saved from a lake bottom before, also the bowl I made from one of the logs. While I was at it, I turned a lamp from one of the lake logs.

Lake Log Lamp

Lake Log Lamp Lake Log Lamp Drying out lake logs Lake Log Lamp Drained Lake

After decades of being submerged, the wood has become gray and full of character. It also makes identify the species tough, I’m guessing oak with a hint of lake dirt. The lamp doesn’t look too bad sporting the perfect lamp shade.

Da Boids

Monday, July 27th, 2009

Boids

Is this yet another rubber origami bird mobile? Why yes, yes it is.

A mobile made up of the classic New York City fixture (nuisance), pigeons. The mobile is made up of five (or six haven’t decided yet) birds. The birds come in three fruit flavors: red, yellow, and blue.

Boids

Moleskin 2.0 Exhibition Entry

Tuesday, June 16th, 2009

I entered the Moleskin 2.0 Exhibition contest. My idea is to use the fore-edge of the notebook. When you fold the notebook length-wise (when the spine practically touches the long edge of the back cover), the fore-edge of the pages fan out. Only when the notebook is folded this way, does a subway map clearly appear. This is due to the fact that the map is printed on the edge while the notebook is positioned like this. You can hide the fact that you are consulting a subway map and be spared the embarrassment and scorn from locals. It’s easier to show you than to explain it.

I was inspired by Martin Frost, a fore-edge painter. I saw his stuff (really amazing stuff) originally on Laughing Squid. Check it out.